
Probably, if you are here and reading this article, you’re looking for a way, how it would be possible to add a custom field to Magento 2 checkout page. This article is all about that. It covers general methods, how this can be done in Magento 2 and at the end of it, I will share with you the source code which adds a custom checkout field to the shipping address form.
A custom checkout field in Magento 2 can be added by creating a “layoutProcessors” block, or with a plugin (interceptor), or at checkout_index_index.xml file. Unfortunately, Magento 2 does not have this functionality on the admin side. However the easiest way is with the 3rd party “Order Attributes” extension.

The way to add a custom checkout field programmatically
However, if you’re curious and the easy is not for you, here is how to make it programmatically. Below are general steps about what has to be done if you want to add a custom checkout field.
- Create new custom module
- Add a new custom field in checkout form
- Collect and save custom data in a database
- Print information on order view page
Step 1. Create new custom module
Our new module will be called Magetrend_CustomField and all the files will be located under app/code/Magetrend/CustomField/. To create a new module, the following files has to be created:
<?php
\Magento\Framework\Component\ComponentRegistrar::register(
    \Magento\Framework\Component\ComponentRegistrar::MODULE,
    'Magetrend_CustomField',
    __DIR__
);<?xml version="1.0"?>
<config xmlns:xsi="http://www.w3.org/2001/XMLSchema-instance"
xsi:noNamespaceSchemaLocation="../../../../../lib/internal/Magento/Framework/Module/etc/module.xsd">
<module name="Magetrend_CustomField" schema_version="2.0.0" setup_version="2.0.0"></module>
</config>Step 2. Add a new custom field in checkout form
A custom checkout field in Magento 2 can be added by creating a custom “layoutProcessors” block. Also, as an example, I will use the “Delivery notes” field which will be added to the shipping address form. We need to create the following files:
<?xml version="1.0"?>
<config xmlns:xsi="http://www.w3.org/2001/XMLSchema-instance"     xsi:noNamespaceSchemaLocation="urn:magento:framework:ObjectManager/etc/config.xsd">
    <type name="Magento\Checkout\Block\Onepage">
        <arguments>
            <argument name="layoutProcessors" xsi:type="array">
                <item name="orderattribute" xsi:type="object">Magetrend\CustomField\Block\LayoutProcessor</item>
            </argument>
        </arguments>
    </type>
</config><?php
namespace Magetrend\CustomField\Block;
class LayoutProcessor implements \Magento\Checkout\Block\Checkout\LayoutProcessorInterface
{
public function process($jsLayout)
{
$attributeCode = 'delivery_note';
$fieldConfiguration = [
'component' => 'Magento_Ui/js/form/element/textarea',
'config' => [
'customScope' => 'shippingAddress.extension_attributes',
'customEntry' => null,
'template' => 'ui/form/field',
'elementTmpl' => 'ui/form/element/textarea',
'tooltip' => [
'description' => 'Here you can leave delivery notes',
],
],
'dataScope' => 'shippingAddress.extension_attributes' . '.' . $attributeCode,
'label' => 'Delivery Notes',
'provider' => 'checkoutProvider',
'sortOrder' => 1000,
'validation' => [
'required-entry' => true
],
'options' => [],
'filterBy' => null,
'customEntry' => null,
'visible' => true,
'value' => ''
];
$jsLayout['components']['checkout']['children']
['steps']['children']['shipping-step']['children']
['shippingAddress']['children']['shipping-address-fieldset']
['children'][$attributeCode] = $fieldConfiguration;
return $jsLayout;
}
}
Inside the process($jsLayout) method we need to add our configuration of our custom checkout field to $jsLayout. The variable $jsLayout is deep, like an ocean array, which contains configuration of checkout fields.
To get a better understanding about $jsLayout configuration, you can use a print_r($jsLayout); function. The full configuration and available inputs you can check at Magento 2 documentation.
Now if you would run the following Magento 2 ssh commands upgrade/compile/deploy, you should see a new custom field in your shipping address form.
bin/magento setup:upgrade;
bin/magento setup:di:compile;
bin/magento setup:static-content:deploy;
Step 3. Collect and save information to a database
The funniest part is to save customer’s data from a custom checkout field to a database. We will save the data directly in the sales_order database table. It is easier to access data directly from an order object than from a separate database table.
In the next code we will add a new column with the same name as our attribute (delivery_note) to sales_order and quote tables, using declarative schema.
<?xml version="1.0"?>
<schema xmlns:xsi="http://www.w3.org/2001/XMLSchema-instance"      xsi:noNamespaceSchemaLocation="urn:magento:framework:Setup/Declaration/Schema/etc/schema.xsd">
    <table name="quote" resource="default" engine="innodb">
        <column xsi:type="text" name="delivery_note" nullable="true" comment="Delivery Note"/>
    </table>
    <table name="sales_order" resource="default" engine="innodb">
        <column xsi:type="text" name="delivery_note" nullable="true" comment="Delivery Note"/>
    </table>
</schema>
Also we need to create a delivery_note attribute for ShippingInformationInterface because our data will be saved there in the beginning.
<?xml version="1.0"?>
<config xmlns:xsi="http://www.w3.org/2001/XMLSchema-instance" xsi:noNamespaceSchemaLocation="urn:magento:framework:Api/etc/extension_attributes.xsd">
<extension_attributes for="Magento\Checkout\Api\Data\ShippingInformationInterface">
<attribute code="delivery_note" type="string"/>
</extension_attributes>
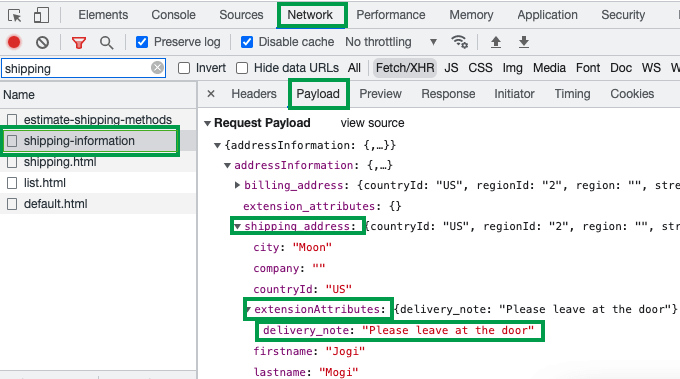
</config>Here now it would be smart to test the code and to make sure everything is working as expected at this point. If you see the new field in shipping address form, it’s a good sign. Moreover we should take a look at Google Chrome console after we fill the form and press on the “Next” button. The information from custom delivery note field should be in the payload of rest/default/V1/guest-carts/*/shipping-information request. If it’s there we are good to go further.
We will save data with a plugin (interceptor). There are a few other ways to save it, but this one is great, because it doesn’t require additional ajax requests and information can be saved directly to a quote object. We need to create the following files.
<?xml version="1.0"?>
<config xmlns:xsi="http://www.w3.org/2001/XMLSchema-instance"
xsi:noNamespaceSchemaLocation="urn:magento:framework:ObjectManager/etc/config.xsd">
    <type name="Magento\Checkout\Model\ShippingInformationManagement">
        <plugin name="magetrend-custom-field-save-info"
type="Magetrend\CustomField\Plugin\ShippingInformationManagement" sortOrder="1"/>
    </type>
</config><?php
namespace Magetrend\CustomField\Plugin;
use Magento\Quote\Api\CartRepositoryInterface;
class ShippingInformationManagement
{
public $cartRepository;
public function __construct(
CartRepositoryInterface $cartRepository
) {
$this->cartRepository = $cartRepository;
}
public function beforeSaveAddressInformation($subject, $cartId, $addressInformation)
{
$quote = $this->cartRepository->getActive($cartId);
$deliveryNote = $addressInformation->getShippingAddress()->getExtensionAttributes()->getDeliveryNote();
$quote->setDeliveryNote($deliveryNote);
$this->cartRepository->save($quote);
return [$cartId, $addressInformation];
}
}Now after we click on the next button in the shipping address form, our information should be saved directly to a quote database table delivery_note column.
The last thing left of this part is to copy our data from the quote table to sales_order. This can by done as following:
<?xml version="1.0"?>
<config xmlns:xsi="http://www.w3.org/2001/XMLSchema-instance"       xsi:noNamespaceSchemaLocation="urn:magento:framework:DataObject/etc/fieldset.xsd">
    <scope id="global">
        <fieldset id="sales_convert_quote">
            <field name="delivery_note">
                <aspect name="to_order" />
            </field>
        </fieldset>
    </scope>
</config><?xml version="1.0"?>
<config xmlns:xsi="http://www.w3.org/2001/XMLSchema-instance" xsi:noNamespaceSchemaLocation="../../../../../lib/internal/Magento/Framework/Event/etc/events.xsd">
<event name="sales_model_service_quote_submit_before">
<observer name="magetrend_customfield_sales_model_service_quote_submit_before"
instance="Magetrend\CustomField\Observer\SaveOrderBeforeSalesModelQuote" />
</event>
</config><?php
namespace Magetrend\CustomField\Observer;
use Magento\Framework\DataObject\Copy;
use Magento\Framework\Event\Observer;
use Magento\Framework\Event\ObserverInterface;
use Magento\Quote\Model\Quote;
use Magento\Sales\Model\Order;
class SaveOrderBeforeSalesModelQuote implements ObserverInterface
{
public $objectCopyService;
public function __construct(
Copy $objectCopyService
) {
$this->objectCopyService = $objectCopyService;
}
public function execute(Observer $observer)
{
$this->objectCopyService->copyFieldsetToTarget(
'sales_convert_quote',
'to_order',
$observer->getEvent()->getQuote(),
$observer->getEvent()->getOrder()
);
return $this;
}
}More information about how this data copying works you can find at Magento 2 documentation
At this point, after we place a new order, our information from our custom checkout field should be saved directly to the sales_order table.
Step 4. Print information on order view page
It’s just an example about how to display data from a custom checkout field. You can use this data whatever you need. I will add it to Sales > Order > View page. The following files has to be created.
<?xml version="1.0"?>
<page xmlns:xsi="http://www.w3.org/2001/XMLSchema-instance" xsi:noNamespaceSchemaLocation="urn:magento:framework:View/Layout/etc/page_configuration.xsd">
    <body>
        <referenceContainer name="content">
            <referenceContainer name="order_additional_info">
                <block class="Magetrend\CustomField\Block\Adminhtml\Attributes"
                       name="customfield_order_attributes"
                       template="Magetrend_CustomField::attributes.phtml" />
            </referenceContainer>
        </referenceContainer>
    </body>
</page>
<?php $order = $block->getOrder(); ?>
<?php if ($order) : ?>
<section class="admin__page-section order-additional-information">
    <div class="admin__page-section-title">
        <strong class="title"><?php echo /* @escapeNotVerified */ __('Additional Information'); ?></strong>
    </div>
    <div id="<?php echo $block->getHtmlId() ?>"
         class="admin__page-section-content order-additional-information-container">
        <div class="admin__page-section-item order-information">
            <div class="admin__page-section-item-content">
                <table class="admin__table-secondary order-information-table">
                    <tr>
                        <th>Delivery Note</th>
                        <td><?php echo $order->getDeliveryNote(); ?></td>
                    </tr>
                </table>
            </div>
        </div>
    </div>
</section>
<?php endif; ?><?php
namespace Magetrend\CustomField\Block\Adminhtml;
use Magento\Framework\AppInterface;
use Magento\Framework\Exception\NoSuchEntityException;
use Magento\Sales\Api\Data\OrderInterface;
class Attributes extends \Magento\Backend\Block\Template
{
public $orderRepository;
public function __construct(
\Magento\Backend\Block\Template\Context $context,
\Magento\Sales\Api\OrderRepositoryInterface $orderRepository,
array $data = []
) {
$this->orderRepository = $orderRepository;
parent::__construct($context, $data);
}
public function getOrder()
{
try {
$orderId = $this->getRequest()->getParam('order_id');
return $this->orderRepository->get($orderId);
} catch (NoSuchEntityException $e) {
return false;
}
}
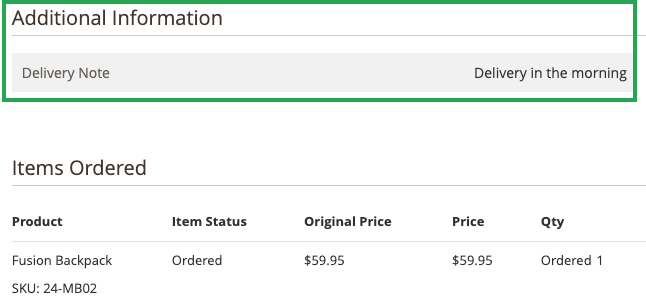
}After all those steps you should see a new block in Admin > Sales > Order > View page. Just like in the image below
I posted the source code on github. It can be found here: https://github.com/magetrend/custom-field. It was written and tested using Magento 2.4.4.
Benefits of choosing Order Attribute extension
The main reason why it’s better to choose order attribute extension – that this decision saves your time. In this article we displayed customer information only just in the order view page, but in many cases you might want to add custom information to invoice, order email, order pdf, order grid page or customer area. Here is the most biggest benefits of choosing our order attribute extension:
- Configure fields via Magento admin. It lets you choose from 10 different types of fields and positions in the checkout page.
- Display data in invoice, order, shipment, credit memo including emails, grids and PDFs
- Edit data without creating a new order
Those are the most important things in my opinion, why you would want to use an extension or at least to try instead of coding this. Moreover our Magento 2 Order Attributes extension has a lot more great features. You can check this out here. Bellow is a quick video how does it works:
Conclusion
It’s not the easiest task to add a custom field in the Magento 2 checkout page. Am I right? In most cases the better way is to choose order attribute extension instead of wasting that much time on this.
Cheers!